Xfive.co 2019 – Designed and Built for Business
- Design
- Development
- Lubos Kmetko
- 9 min read

Photo by Joey Kyber on Unsplash
Xfive has undergone a brand refresh. In this article we will take a closer look into how we built our new website.
In 2016 our company rebranded to Xfive. We focused on performance when building a new website back then. The goal of this year’s brand refresh was to better support our business development.
Key website characteristics
Our new website has the following key characteristics:
- brand new design by obys agency
- modern WordPress theme built with our development framework Chisel
- GitLab based development workflow with an automatic deployment to Pantheon hosting
- custom integration of forms with Salesforce
- solid performance
- strict Content Security Policy
Let’s take a look at these in more detail.
New design
The main requirement for the brand refresh was to give our brand a more professional look so it better reflects our experience.


The design of our website utilizes parts of the new logo as color accents and background patterns. Generous usage of white space and big typography of the newly selected font, Manrope, sets up a good visual hierarchy. You can check out more details of the new design in the obys case study.
Chisel based WordPress website
Our website runs on Chisel, our custom WordPress development framework. Its main features are:
- Timber for a faster and easier way to build themes
- Chisel WordPress starter theme with a logical, easy to follow structure
- Gulp build system with Browsersync and gulp-rev support
- Twig templating engine and SCSS with ITCSS architecture
- webpack and ES6 with Babel
- stylelint, Prettier and ESLint with config tailored for Chisel and Prettier synced together for consistent and hassle free code formatting
You can read more about WordPress development with Timber in our blog post An MVC-like WordPress Development with ACF and Timber.

When it comes to the front-end, the redesign of our old website was the first time we used ITCSS. Three years later and we are still big proponents of ITCSS, which is an integral part of Chisel.
Even though its usage is common with WordPress websites, we don’t rely on jQuery. We rather write vanilla JavaScript modules that are transpiled using Babel.
Development workflow
We developed our website on a self hosted instance of GitLab. GitLab provides solid project management features, for example, issue boards which you can use as Kanban boards.

In addition to that, GitLab has advanced Continuous Integration / Deployment features which we use to build the theme front-end and automatically deploy files to the Pantheon hosting.
This setup could use some improvements yet, like supporting Pantheon upstreams. Currently we can only update WordPress from local instance and not from the Pantheon dashboard. Anyway, overall it nicely fits our Chisel based development workflow.
Salesforce integration
We wanted to improve Salesforce integration in the new version of our website. We used a Gravity Forms add-on for sending form submissions to Salesforce, however, we wanted to have better control over the setup.
This time we did a custom implementation of Salesforce’s Web To Lead functionality. This allows us to use Ajax for sending out the overlay Work with us form and also to store custom data like UTM parameters to Salesforce. We offload files uploads to Amazon S3.

Once the lead is stored in Salesforce, Salesforce sends an email confirmation to the client, as well as, a notification about the new lead to the operational team. WordPress sends a notification with the lead data to a log email – just in case the lead wasn’t stored in Salesforce for some reason.
Finally, we’ve decided to use Google reCAPTCHA v3 to protect our forms. So far it works reliably and together with the JavaScript based forms it has reduced spam entries to practically zero.
Obviously, this custom solution took us a bit longer to implement. Nonetheless, it gives us plenty of options for the future improvements (eg. geolocation of the leads). It’s also part of our strategy of extending our services to Salesforce development. If you need a custom Salesforce integration, don’t hesitate to contact us.
Performance
Performance was the main focus of our old website. It had downgraded over time and further improvements were limited by our previous hosting. That’s why we switched to Pantheon, which offers great performance out-of-box thanks to global CDN and advanced caching. Chisel itself puts a lot of emphasis on performance too so we had solid foundations to build on.
WebP images
We certainly wanted to use WebP images on our new website. With Edge adding support for the WebP images last year and Firefox this year, we felt it was the right time.
Eventually, we implemented WebP images using EWWW cloud compression. This service optimizes the original JPG file, generates a WebP version of it, and stores it back to your server.
Since the name of the generated WebP image only differs by suffix, we could easily implement a solution with appropriate JPG fallback in our picture component in the Twig templates:
{% set thumbnail = Image(thumbnail) %}
{% set tag = caption is not empty ? 'figure' : 'div' %}
{% set defaultSize = defaultSize is not empty ? defaultSize : 'full' %}
{% set defaultSizeImg = thumbnail.src(defaultSize) %}
{% set sizes = sizes is not empty ? sizes : thumbnail.img_sizes %}

<{{tag}} class="{{ className('o-picture', size, still ? 'still', contain ? 'contain') }} {{ className }}" {{ attrs }}>
  <picture class="o-picture__inner">
    {% set srcset = thumbnail.srcset %}
    {% if srcset %}
      <source data-srcset="{{ srcset | replace({'.jpg ': '.jpg.webp '}) }}" srcset="data:image/gif;base64,R0lGODlhAQABAAAAACH5BAEKAAEALAAAAAABAAEAAAICTAEAOw== 1w" sizes="{{ sizes }}" type="image/webp">
      <source data-srcset="{{ srcset }}" sizes="{{ sizes }}" srcset="data:image/gif;base64,R0lGODlhAQABAAAAACH5BAEKAAEALAAAAAABAAEAAAICTAEAOw== 1w" type="image/jpeg">
    {% endif %}
    <img class="o-picture__image lazyload {{ preload ? 'lazypreload' : '' }}" data-src="{{ thumbnail.src(defaultSize) }}" src="data:image/gif;base64,R0lGODlhAQABAAAAACH5BAEKAAEALAAAAAABAAEAAAICTAEAOw==" alt="{{ altText ?: thumbnail.alt }}">
  </picture>
  {% if caption is not empty %}
    <figcaption class="o-picture__caption">
      {{ caption }}
    </figcaption>
  {% endif %}
</{{tag}}>
Next, we implemented lazy loading of images and YouTube videos with Lazysizes library. Below is a custom implementation for content images and videos that uses DOMDocument class to parse the post content.
<?php

namespace Chisel;

/**
 * Class Media
 * @package Chisel
 *
 * Default media settings for Chisel
 */
class Media {

  public function __construct() {
    add_filter( 'the_content', array( $this, 'lazyLoadContentImages' ), 20 );
    if ( !is_admin() ) {
      add_filter( 'embed_oembed_html', array( $this, 'lazyLoadYoutubeVideos' ), 100, 4 );
    }
  }

  /**
   * Lazy load content images
   * @param $content
   */
  function lazyLoadContentImages( $content ) {
    if ( empty( $content ) ) {
       return $content;
    }

    $src_replace = 'data:image/gif;base64,R0lGODlhAQABAAAAACH5BAEKAAEALAAAAAABAAEAAAICTAEAOw==';
    return $this->setLazyLoad($content, 'img', $src_replace);
  }

  /**
   * Lazy load YouTube Videos
   */
  function lazyLoadYoutubeVideos( $cache, $url, $attr, $post_id ) {

    if ( false !== strpos( $url, "youtube.com") || false !== strpos( $url, "youtu.be" ) ) {
      $cache = $this->setLazyLoad($cache, 'iframe', 'about:blank');
    }
    return $cache;
  }

  /**
   * Set lazy load
   *
   * Adds lazyload class to element and replaces src with data-src
   *
   * @param string $html content to process
   * @param string $tag name of HTML element
   * @param string $src_replace src replacement string
   * @return string $html
   */
  private function setLazyLoad( $html, $tag, $src_replace ) {

    $dom = new \DOMDocument();

    libxml_use_internal_errors( true );

    $dom->loadHTML( '<div>' . mb_convert_encoding( $html, 'HTML-ENTITIES', 'UTF-8' ) . '</div>', LIBXML_HTML_NOIMPLIED | LIBXML_HTML_NODEFDTD );

    libxml_clear_errors();

    foreach ( $dom->getElementsByTagName( $tag ) as $element ) {
      $classes = $element->getAttribute( 'class' );
      $classes .= " lazyload";
      $element->setAttribute( 'class', $classes );

      $src = $element->getAttribute( 'src' );
      $element->setAttribute( 'data-src', $src );
      $element->setAttribute( 'src', $src_replace );

      if ( $element->hasAttribute( 'srcset' ) ) {
        $srcset = $element->getAttribute( 'srcset' );
        $element->setAttribute( 'data-srcset', $srcset );
        $element->setAttribute( 'srcset', $src_replace . ' 1w' );
      }

      if ( $element->hasAttribute( 'frameborder' ) ) {
        $element->removeAttribute( 'frameborder' );
      }

      $html = $dom->saveHTML();
    }

    return $html;
  }
}
Performance results
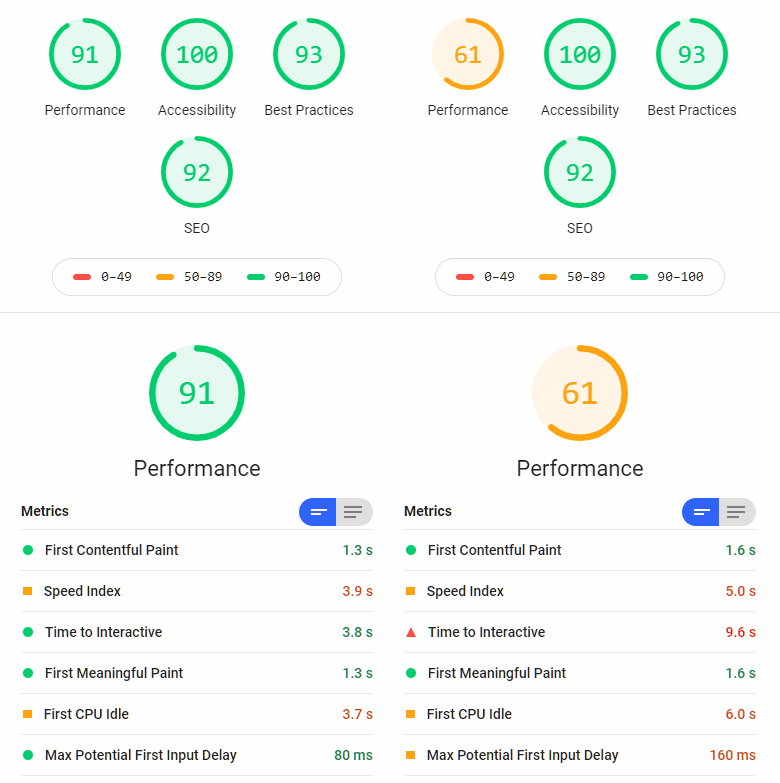
One of the best tools to detect and find solutions to potential issues with performance, usability, accessibility and SEO is Google Lighthouse. We used it early and often in our development process.
Initially, we achieved very good performance results. However, when we added 3rd party tools like Drift and Hotjar to the site, performance got significantly worse.
3rd party tools are performance killers – one tool can throw much of your previous effort out of the window

Since our new website was quite a change from the previous one, we cannot afford to stay in blind when it comes to how our visitors use it. As soon as things settle down, we’ll consider removing Hotjar at least.
Security
Despite hosting our new website in very secure environment at Pantheon we further wanted to increase the site’s security. We implemented a strict Content Security Policy. In WordPress it’s a bit tricky as plugins tend to generate inline styles and scripts, not to mention 3rd party tools.
The process of setting CSP on a WordPress website was a bit cumbersome, but in return we got A+ from Mozilla Observatory
Using unsafe-inline on script-src policy would help here but that makes the whole CSP almost pointless. We’ve found that the better solution was to add script and styles hashes to CSP one by one. Browsers like Google Chrome conveniently display a hash of falling script or style in the console so you can copy it from there. Contrary to nonce which needs to have a unique value on each request, hashes are more favorable to HTML caching too.
Conclusion
For us, developing a new version of our company website is an opportunity to explore new approaches. We can later integrate them to our development workflow so our customers can benefit from them too. Three years ago it was ITCSS and performance optimization, this year we focused on custom Salesforce integration, WebP images and security.
The developer in us might cry when we see how the performance of our website downgrades after adding tools like Drift or Hotjar. But we also understand that to support the business goals of modern websites, compromises are sometimes necessary. If you are interested in utilizing our experience with advanced WordPress development, feel free to contact us.


